A practical guide to MCP vs A2A: two essential protocols for building scalable, collaborative multi-agent AI systems.
.png)


.png)
TL;DR
- MCP (Model Context Protocol) provides a standardized, secure way for AI agents to access external tools, APIs, and data sources, simplifying integrations and improving reliability.
- A2A (Agent-to-Agent Protocol) enables direct, stateful communication and task coordination between agents, essential for dynamic multi-agent workflows.
- Common challenges include fragmented context and complex state management when scaling agent interactions.
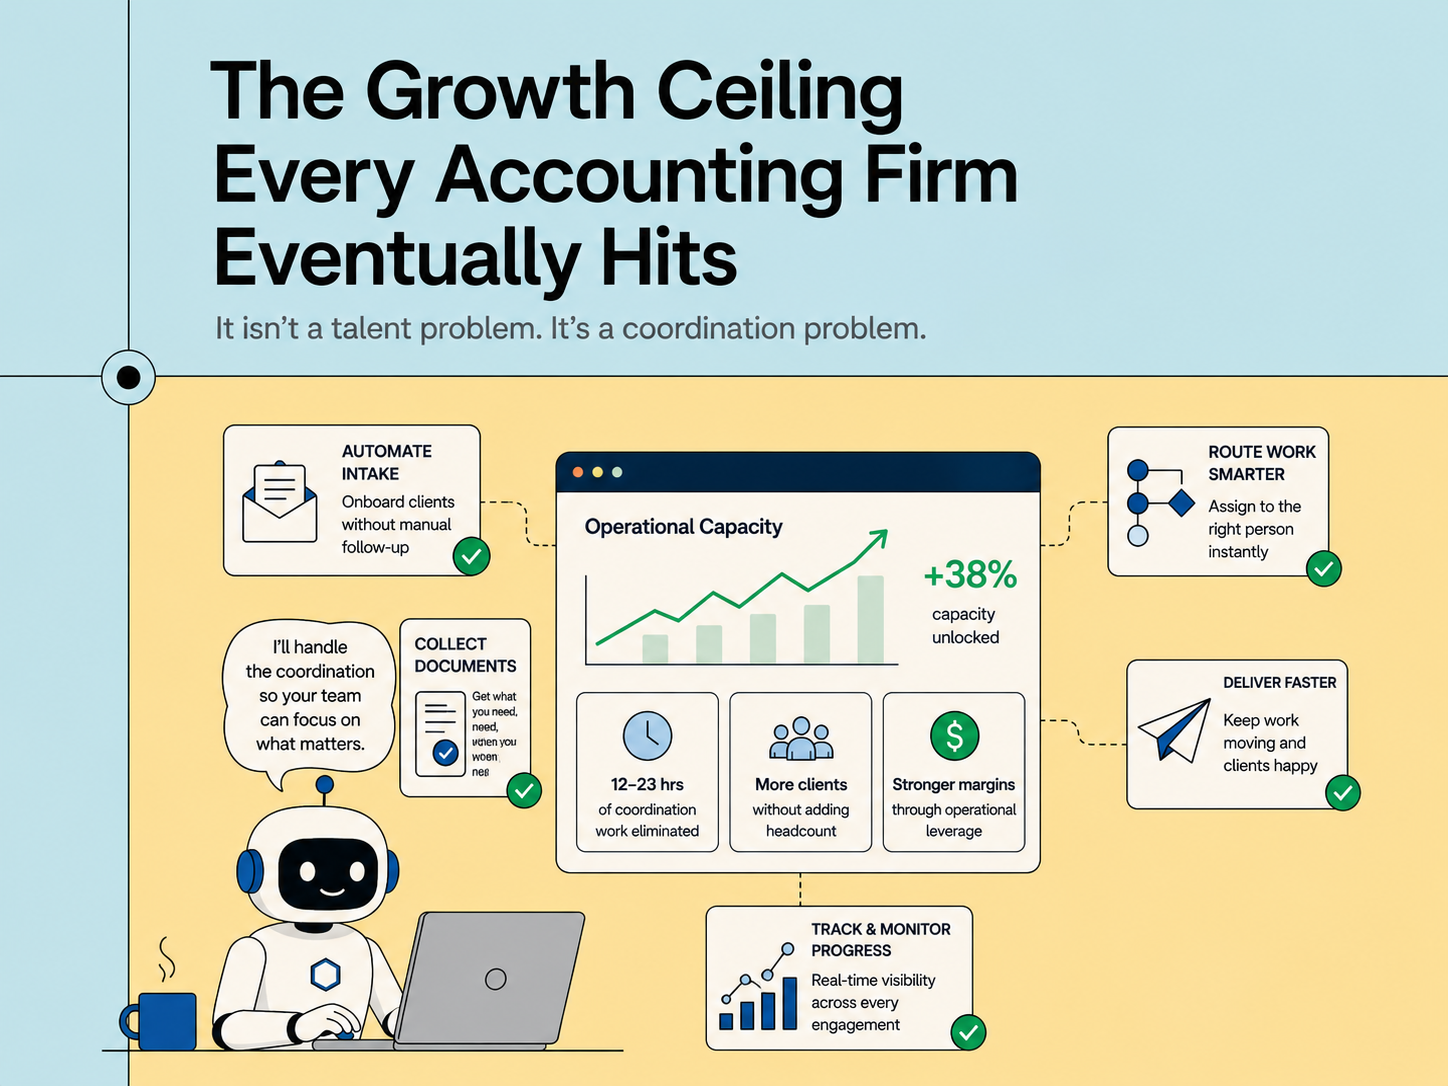
- For a unified, production-ready solution to these challenges, see how Adopt AI leverages MCP and A2A to automate actions and deliver measurable business outcomes.
- Adoption of MCP and A2A protocols is growing among enterprises aiming to build scalable, interoperable AI ecosystems that drive automation and enhance operational efficiency.
In the exciting world of AI, building smart agents that can do real work means mastering how they communicate and collaborate.
Two key protocols make this possible: the Model Context Protocol (MCP) and Agent-to-Agent (A2A). MCP acts like a universal connector, letting AI agents effortlessly plug into tools and data sources. Meanwhile, A2A is all about teamwork helping multiple AI agents discover each other, share information, and collaborate smoothly to tackle complex tasks.
Imagine MCP as giving each AI assistant their own powerful toolkit, while A2A is the communication network linking these assistants into a high functioning team. Together, they let developers create modular, scalable AI ecosystems where agents don’t just work in isolation but as part of a coordinated intelligent system.
This article dives into how MCP and A2A work in practice, showing how combining their strengths helps build flexible, powerful AI applications with insights, examples, and best practices for developers ready to build the future of AI collaboration . Also, see how platforms like Adopt AI are helping enterprises adopt MCP and A2A protocols, making it easier for industries to implement these standards smoothly and effectively in real-world applications to accelerating development and simplifying integration for complex, multi-agent AI ecosystems
What is the Model Context Protocol (MCP)?
MCP (Model Context Protocol) is an open-source standard for connecting AI applications to external systems.
Using MCP, AI applications like Claude or ChatGPT can connect to data sources (e.g. local files, databases), tools (e.g. search engines, calculators) and workflows (e.g. specialized prompts) enabling them to access key information and perform tasks.
Think of MCP like a USB-C port for AI applications. Just as USB-C provides a standardized way to connect electronic devices, MCP provides a standardized way to connect AI applications to external systems.
What can MCP enable?
- Agents can access your Google Calendar and Notion, acting as a more personalized AI assistant.
- Claude Code can generate an entire web app using a Figma design.
- Enterprise chatbots can connect to multiple databases across an organization, empowering users to analyze data using chat.
- AI models can create 3D designs on Blender and print them out using a 3D printer.
Idea Behind the MCP Protocol
The core idea is simple: MCP gives AI agents a consistent way to connect with tools, services, and data no matter where they live or how they’re built.
Instead of just answering questions, agents can now perform useful, multi-step tasks like retrieving data, summarizing documents, or saving content to a file.
Before MCP, each of those actions required a unique API, custom logic, and developer time to glue it all together.
Need for MCP in LLM Models
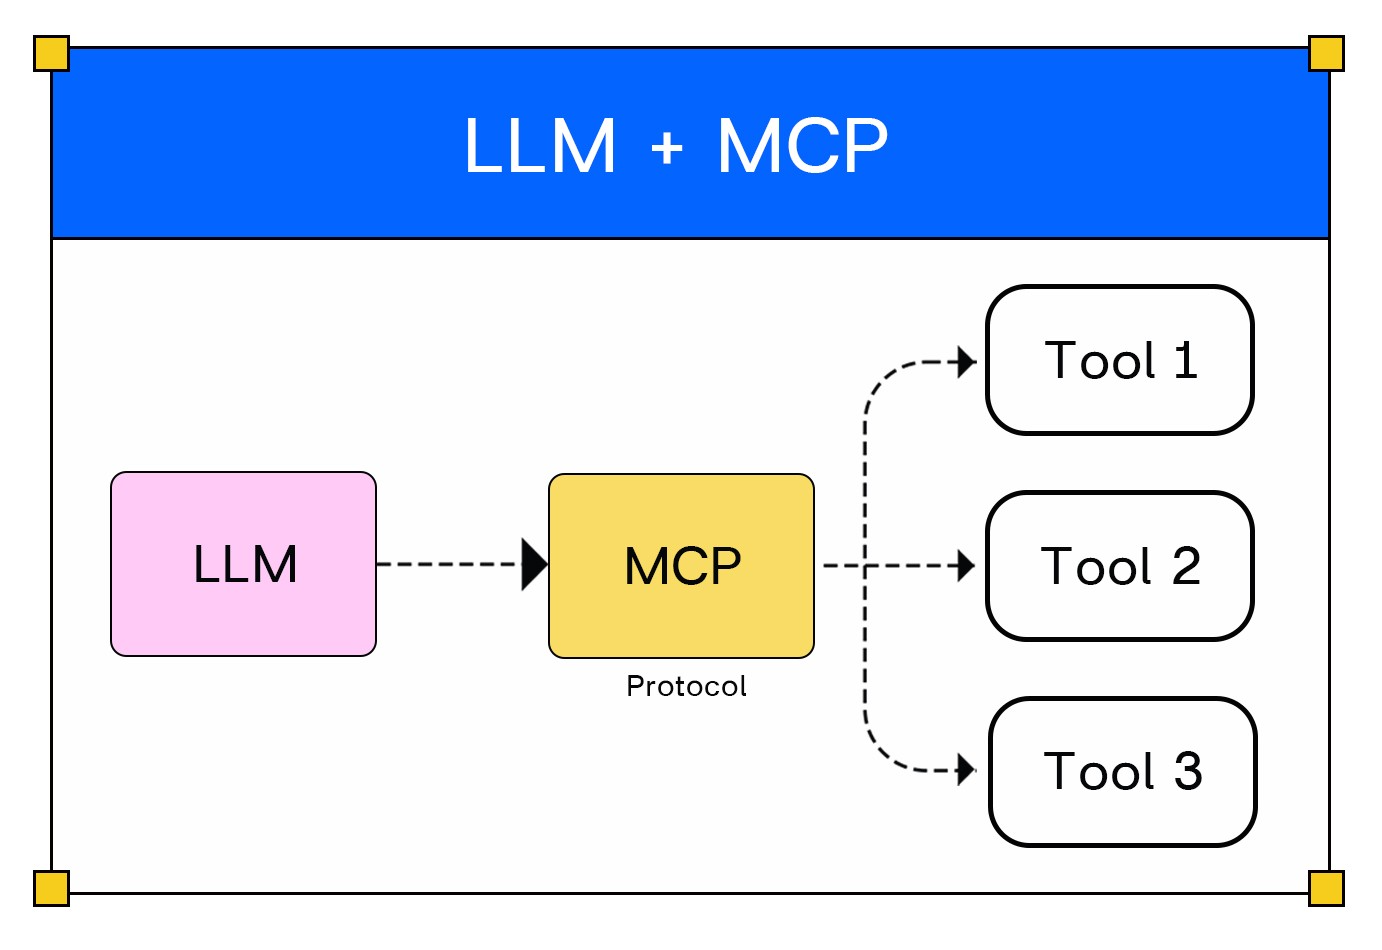
Large Language Models (LLMs) like ChatGPT or Claude often need to connect with many external tools such as databases, file systems, and APIs. Traditionally, each tool required a unique integration, creating complex, hard-to-maintain code and increasing development time.
This “N x M” integration problem, where every LLM and tool pair requires a custom connection, leads to inefficiency, inconsistency, and higher costs. MCP addresses this by providing a single, standardized endpoint that acts as a universal bridge between LLMs and multiple external tools.
Instead of writing custom integration code for each tool, developers use MCP servers to expose many tools in a uniform way. This simplifies the system architecture, reduces code complexity, improves security, and accelerates development by allowing LLMs to communicate with any tool through one consistent interface.
Architecture of Model Context Protocol (MCP)
MCP follows a modular client-server architecture designed to simplify and standardize how large language models (LLMs) connect with external systems.

Key Components:
- Host Application: The user-facing AI app (like Claude Desktop or an AI-enhanced IDE) where users interact with LLMs. The host manages user inputs, permissions, and orchestrates workflow.
- MCP Client: Included within the host, this component manages secure communication with MCP servers. It handles protocol details, establishes connections, negotiates capabilities, and routes messages.
- MCP Server: Independent services exposing specific tools, APIs, or data sources to the LLM via MCP. Servers focus on providing discrete capabilities, such as database access, external APIs, or workflow actions. They can run locally or remotely.
- Transport Layer: The communication framework that allows data exchange between clients and servers. MCP supports local communication (via standard input/output streams) and remote communication (using HTTP plus streaming events).
Understanding Communication Between MCP Components
MCP defines a clear flow for communication among its core components, allowing
effortless interaction between AI models and external tools.
Step 1: Input to MCP Host
Communication begins when the MCP Host receives input (Ip) from the user or an application environment like an IDE. This host includes the MCP Client, which acts as the intermediary for all MCP-based communication.
Step 2: Host to LLM (Large Language Model)
The MCP Host then sends the user’s question, enriched with the current context and available tools, to the LLM. The context helps the LLM understand the surrounding state and resources it can leverage.
Step 3: LLM Tool Selection
Using the context and tools information, the LLM decides which tools it needs to address the user’s query. It responds back with "Which Tools to Use," instructing the MCP Host on the next action.
Step 4: MCP Host Calls MCP Server
Following the LLM’s tool choices, the MCP Client within the host makes a call to the appropriate MCP Server responsible for managing the selected external tool.
Step 5: Tool Invocation and Response
The MCP Server executes the specific tool operation and sends the results back to the MCP Host.
Step 6: Output to LLM
Finally, the MCP Host forwards the tool’s output to the LLM, which integrates the results and produces the final output (O/p) delivered to the user.
The structured communication model standardizes complex integrations, enabling modular, secure, and flexible AI systems that easily scale by adding MCP servers without changing host or model code.
This architecture enables an LLM to communicate securely and efficiently with multiple external tools simultaneously, ensuring flexibility, scalability, and easy extensibility. Instead of building many custom point-to-point integrations, MCP standardizes communication into a manageable, universal interface.
MCP Server & Agent Client – Example Setup
To demonstrate the core communication mechanism of the MCP, here is a simple example of a server exposing a tool endpoint and an agent client invoking it using Python.
Prerequisites
- Python 3.9+
- Virtual environment (recommended)
- Libraries: fastapi, uvicorn, requests
- Editor: VS Code / PyCharm
Install dependencies in your virtual environment:
pip install fastapi uvicorn requestsMCP Server (server.py)
This Python script uses FastAPI to create a minimal web server that exposes a /hello endpoint. When called, this endpoint responds with a JSON message confirming the server’s availability.
from fastapi import FastAPI
from fastapi.responses import JSONResponse

app = FastAPI()
@app.get("/hello")
async def hello():
    return JSONResponse(content={"message": "Hello, Client!"})

if __name__ == "__main__":
    import uvicorn
    uvicorn.run(app, host="0.0.0.0", port=8000)
Run this server by executing:
python server.py
MCP Agent Client (client.py)
The following client script acts as an AI agent. It makes an HTTP GET request to the server’s /hello endpoint, receives the JSON response, and prints the message content.
import requests
def call_hello():
    url = "http://localhost:8000/hello"
    response = requests.get(url)
    data = response.json()
    print("Server Response:", data)

if __name__ == "__main__":
    call_hello()
Run the client with:
python client.pyExpected Output:
When you run the client script (client.py), you should see output similar to this in your console:
Server Response: {'message': 'Hello, Client!'}This output indicates that the client successfully made a request to the MCP server's /hello endpoint and received the structured JSON response, demonstrating the basic agent-to-tool communication enabled by MCP.
MCP Tool Invocation
MCP tool invocation is the process where an AI agent sends a structured JSON-RPC request to a server to execute a specific tool, passing required parameters and receiving a structured response, enabling dynamic interaction with external systems.
In production, MCP uses JSON-RPC to make structured requests and receive responses reliably, defining tool schemas for discoverability and supporting multiple agents interacting with multiple tools concurrently.
Developers can use MCP SDKs or APIs to invoke tools. For example, an agent client can call a weather tool by sending JSON-formatted requests specifying the function and parameters and then await structured responses.
Example of MCP JSON-RPC communication:
JSON-RPC Request:
The client sends this request to the MCP server to get weather information for New York:
{
  "jsonrpc": "2.0",
  "id": 1,
  "method": "tools/call",
  "params": {
    "name": "get_weather",
    "arguments": {
      "location": "New York"
    }
  }
}
Possible JSON-RPC Server Response:
If successful, the server returns structured weather data:
json
{
  "jsonrpc": "2.0",
  "id": 1,
  "result": {
    "temperature": "18°C",
    "condition": "Partly cloudy"
  }
}
Error Response:
If the parameters are invalid, the server returns an error:
{
  "jsonrpc": "2.0",
  "id": 1,
  "error": {
    "code": -32602,
    "message": "Invalid params"
  }
}
This example shows how MCP uses standardized JSON-RPC requests and responses, allowing AI clients to dynamically call external tools and handle responses or errors consistently to enable seamless integration between AI clients and diverse tools or services.
Enabling MCP at Enterprise Scale
- Start by setting up strong MCP servers to handle all the AI connections and tool linkups across your company.
- Hook up your important systems like CRMs and databases with MCP-friendly adapters so AI can easily access the data it needs.
- Make sure security is rock solid, with clear rules about who can see or do what, keeping sensitive info safe.
- Build AI agents that share info smoothly and work as a team using MCP.
- Keep an eye on the system’s health and performance with monitoring tools to avoid hiccups.
- Use MCP as a common platform to help teams across departments work together better.
- Take advantage of platforms like Adopt AI to speed up integration and make everything easier.
What to Watch Out For (And How to Fix It)
- If you get stuck because inputs or outputs don’t quite match, make sure you’ve defined exactly what goes in and comes out. A clear format helps avoid confusion.
- Trouble logging in or permissions not working? Double-check your tokens and roles, and keep an eye on logs for anything unusual.
- If connections keep dropping, check your network and confirm your communication protocols are set up right and supported.
- Multi-step tasks not flowing smoothly? That usually means context isn’t getting passed along correctly—make sure each step remembers what happened before.
What Is Agent2Agent Protocol (A2A)?
A2A is an open standard that lets different AI agents talk to each other, no matter who made them or what system they run on. It was built using Google’s experience with multi-agent systems and works alongside Anthropic’s MCP, which gives agents access to tools and data.
This protocol makes sure that agents across different platforms or companies can work together smoothly and securely. It’s designed for big, complex AI setups where many agents need to collaborate to get things done.
Real Use Case: Planning a Trip with Multiple AI Agents
Picture this: You ask an AI assistant to plan a trip for you. Instead of one all-in-one AI, several specialized agents take the stage. One looks for flights, another finds hotels, and a third suggests fun local activities. Thanks to A2A, these agents smoothly communicate with each other sharing information, asking for updates, and working as a team.
For example, the flight agent might check for the best routes, then tell the hotel agent when it’s ready to book. The local guide agent might suggest sightseeing once flights and accommodation are sorted. Even though these agents might come from different companies or be built on different systems, A2A lets them collaborate securely and reliably as if they were on the same team.
This setup saves users from juggling multiple apps or services while enabling companies to deliver smarter, coordinated AI services.
The Importance of Collaboration Among AI Agents
In today’s AI systems, many tasks are complex and involve multiple steps or areas of expertise. For example, managing a supply chain covers everything from ordering raw materials to tracking shipments, scheduling deliveries, and monitoring inventory. No single AI is likely to handle all these efficiently on its own.
That’s where multi-agent collaboration comes in. Specialized AI agents share information and updates in real time, working together as a team. They divide the work based on their skills, allowing complex workflows to move smoothly and quickly.
This teamwork also makes the system robust. If one agent encounters an issue or goes offline, other agents can adapt or take over, so the whole process keeps going without interruption.
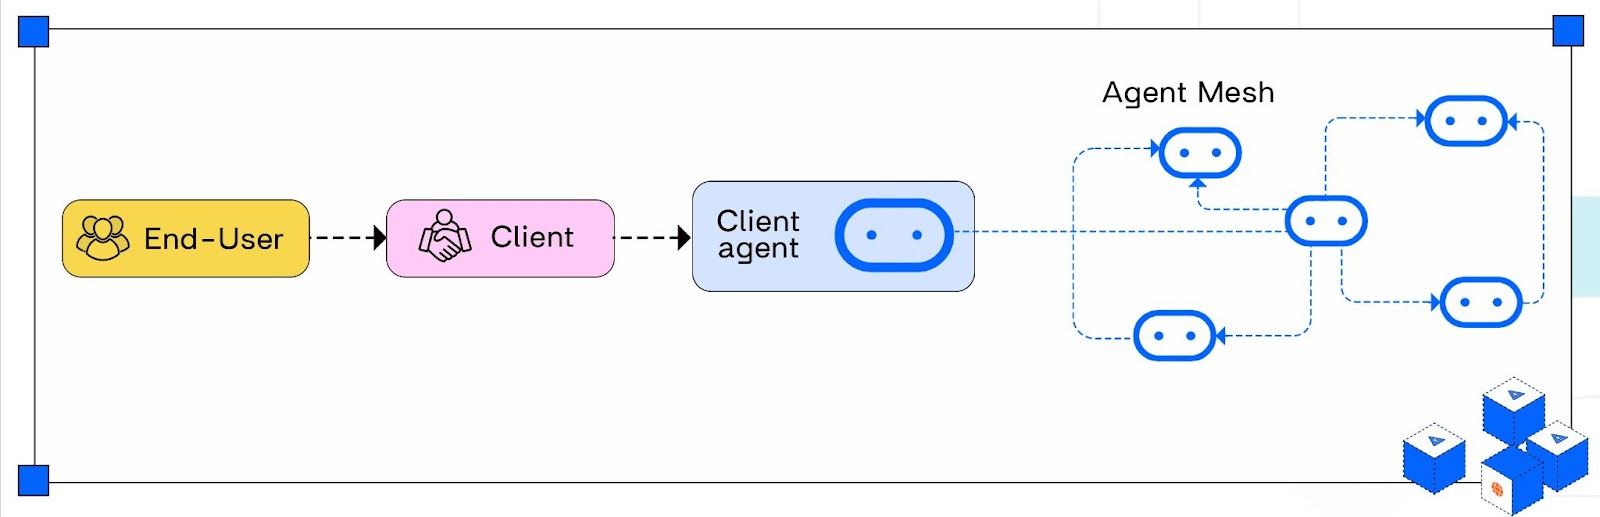
Multi-agent mesh architecture
Understanding How Agent2Agent Protocol (A2A) Works
A2A enables autonomous AI agents to communicate and collaborate securely in a standardized and interoperable way.
- The Client Agent initiates a request for action or collaboration.
- The Remote Agent receives the request and checks if it can fulfill it based on its capabilities.
- If the task is manageable, the remote agent accepts and processes it, returning results. Otherwise, it declines.
A2A capabilities power the workflow and ensure smooth collaboration among agents:
- Discovery: Agents publish their skills and interaction methods via machine-readable "Agent Cards," letting others find the most suitable agents for tasks.
- Negotiation: Agents agree on communication methods—like text, audio, video, or forms—to ensure clear exchanges.
- Task and State Management: Agents track task progress, dependencies, and statuses, enabling coordinated, resilient workflows.
- Collaboration: Agents dynamically interact, requesting clarifications and exchanging information to meet shared goals.
A2A Protocol Workflow architecture
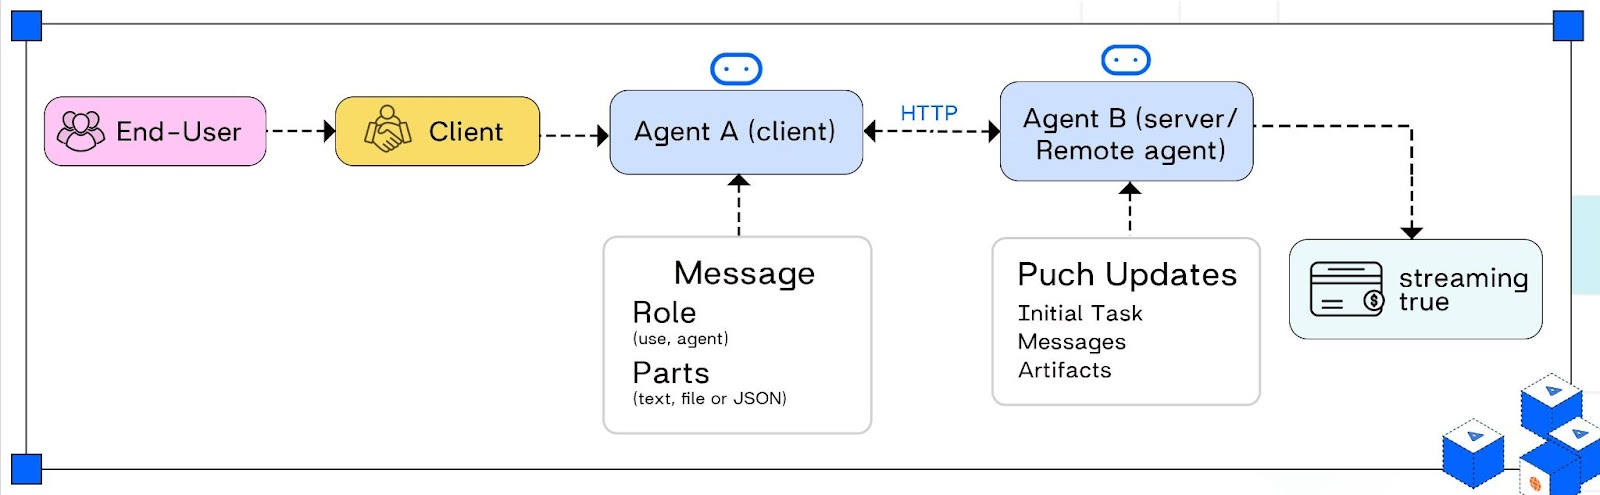
Step 1: Agent Discovery
The process begins when a client agent (Agent A) needs assistance and discovers remote agents (Agent B) via their Agent Cards — JSON documents published at a well-known URL. These cards describe each agent’s capabilities, endpoints, and security requirements, enabling dynamic discovery and selection of suitable collaborators for the task.
Step 2: Basic Interaction
Using information from the Agent Card, Agent A initiates communication by sending structured JSON-RPC messages over secure HTTP(S) to Agent B. Messages include roles, task details, and “parts” which can be text, files, or JSON data. This interaction establishes a session where agents exchange requests, responses, and progress updates, forming the foundation for seamless collaboration.
Step 3: Handling Real Work
( Processing & Task Lifecycle & Polling)
Once Agent A sends a structured message describing the work that needs to be done, Agent B (the remote agent) begins processing the task. At this stage, the focus shifts from simple request/response to managing the entire lifecycle of a task.
- Task Creation: The message sent from Agent A includes a unique task ID plus context (role, parts, and parameters). This allows Agent B to track each job individually.
- Task Management: Agent B maintains the state of the task (e.g., received, processing, completed, or failed) and produces artifacts as work progresses. These artifacts or outputs can be files, text, or structured data in JSON format.
- Lifecycle Communication: Throughout the task’s lifecycle, Agent B can update Agent A about status changes or progress by sending messages back. Instead of waiting for completion, Agent A can poll Agent B using the task ID (as depicted by the repeated HTTP(S) arrow).
- Polling for Results: Agent A periodically requests status updates. As soon as Agent B finishes processing, it responds with the final artifact and task state. This ensures asynchronous workflows and robust, fault-tolerant collaboration.
Task Lifecycle & Polling: Challenge
- In A2A systems, once Agent A requests a task from Agent B, Agent A repeatedly checks (polls) for updates on the task’s status using HTTP(S).
- Agent B maintains the current state of the task and responds with the latest status when polled.
- While polling works for updating on progress or completion, it’s inefficient—it uses unnecessary network bandwidth and resources, especially when the task updates are infrequent or take time.
Step 4: Real-time Updates: Streaming with SSE
- Instead of polling, Agent B (server/remote agent) proactively pushes updates to Agent A (client agent) the moment something changes.
- This streaming uses Server-Sent Events (SSE) over HTTP(S), delivering initial task status, ongoing messages, and artifacts (final results) in real time.
- If Agent B’s Agent Card indicates streaming: true, Agent A knows it can subscribe to these live updates rather than repeatedly asking for status.
- The system sends JSON messages as soon as data is available—maximizing efficiency and responsiveness for complex agent workflows.
However, polling’s inefficiencies led to innovations like real-time streaming via Server-Sent Events (SSE), which allow agents to push updates instantly—dramatically improving responsiveness and resource efficiency.
Together, these steps enable the creation of modular, scalable multi-agent systems that foster loose coupling, fault tolerance, and seamless orchestration of diverse AI capabilities.
Example Setup: Registering Agents and Task Messaging Format
Agent Card JSON Example:
{
  "id": "agent-123",
  "name": "DocumentProcessor",
  "capabilities": ["parse", "validate", "summarize"],
  "endpoint": "https://agent.example.com/api/tasks",
  "auth": {
    "type": "Bearer",
    "token": "your-auth-token"
  },
  "streaming": true
}
The remote agent publishes this card at a known URL (e.g., /.well-known/agent.json). This allows client agents to discover its capabilities and communication endpoint.
Task Message Format:
{
  "task_id": "task-456",
  "action": "parse",
  "parameters": {
    "document_url": "https://example.com/doc.pdf"
  },
  "state": "SUBMITTED"
}
Code Walkthrough: A2A Message Exchange and Task Delegation
This code demonstrates a basic example of A2A protocol message exchange and task delegation in Python.
Step 1: Fetch the Agent Card (metadata) from the remote agent's
The client first fetches the remote agent's metadata (Agent Card) from a well-known URL to learn how to communicate with the agent (endpoint, auth token, capabilities)
 import requests
  import json
  agent_card_url ="https://agent.example.com/.well-known/agent.json"
  response = requests.get(agent_card_url)
  agent_card = response.json()
Step 2: Define a task message with unique ID, action name, parameters, and initial state
It then defines a task with an ID, action, and parameters (here, parsing a document from a URL).
task = {
    "task_id": "task-456",
    "action": "parse",
    "parameters": {
        "document_url": "https://example.com/doc.pdf"
    },
    "state": "SUBMITTED"
    }
Step 3: Extract endpoint URL and authentication token from the Agent Card
Using the metadata, it sends the task request to the agent's endpoint with proper authorization via HTTP POST.
endpoint = agent_card['endpoint']
   headers = {
    "Authorization": f"Bearer {agent_card['auth']['token']}",
    "Content-Type": "application/json"
}
Step 4: Send the task request to the remote agent via HTTP POST
The client immediately receives the task status, prints it, and then periodically polls the agent’s endpoint to get status updates until the task is either completed or failed.
task_response = requests.post(endpoint, json=task, headers=headers)
task_status = task_response.json() # Get immediate response
 print("Initial Task Status:", task_status['state'])
Step 5: Poll the remote agent periodically to check task status updates
import time
 while task_status['state'] not in ['COMPLETED', 'FAILED']:
  time.sleep(2)
  status_response = requests.get(f"{endpoint}/{task['task_id']}",
  headers=headers)
  task_status = status_response.json() # Update status with latest
   info
Step 6: Once task completes or fails, print the result or failure message
Finally, it prints the task result if successful or an error message if it failed
print("Current Task State:", task_status['state'])Capacity for increased workload
- Agents discover collaborators dynamically via Agent Cards, allowing a decentralized, distributed network of agents.
- The use of asynchronous tasks and streaming updates (SSE) helps handle many simultaneous requests without bottlenecks.
Fault Tolerance:
- Task lifecycle states (SUBMITTED, WORKING, FAILED, COMPLETED) allow agents to recover gracefully from failures.
- Retries can be done on transient errors, and partial results can be cached.
- Secure authentication and encrypted communication maintain trust and data integrity in multi-agent environments.
MCP vs A2A: Understanding Their Unique Strengths and How They Work Together
Let’s see how MCP and A2A each play a unique role MCP helps agents securely connect to tools and resources, while A2A enables agents to communicate and collaborate with one another to accomplish tasks efficiently.
Bridging Challenges with Practical Solutions: How Adopt AI Simplifies MCP and A2A Implementation
Enterprises building scalable AI workflows using MCP and A2A protocols face several practical challenges:
Fragile Integration with Business Tools:
Writing custom connectors for diverse systems like CRMs and databases often creates fragile links that require constant maintenance and slow progress.
Complex Multi-Agent Coordination:
Managing asynchronous communication and shared state across multiple agents can be error-prone and difficult to debug, especially as systems scale.
Security and Real-Time Context Management:
Protecting sensitive data while maintaining consistent, real-time context across agents requires robust encryption and strict access controls.
Deployment and Operational Complexity:
Establishing reliable CI/CD pipelines, automated testing, and scalable infrastructure is critical but challenging, with common risks of communication breakdowns and performance bottlenecks.
How Adopt AI Tackles These Challenges
Automatic API Discovery with Deep MCP Servers
Unlike conventional MCP directories and servers that only expose a handful of top-level actions, Adopt AI delivers depth and coverage. With Zero-Shot API Ingestion (ZAPI), Adopt automatically discovers and converts every endpoint of an application into an agent-ready tool. This creates a deep MCP server with 100% coverage of an application’s internal tooling. Enterprises can then deploy this server anywhere—whether powering their in-house agents or enabling users via external chat clients like Claude or GPT.
Pre-Built MCP Registry for External Apps
Adopt maintains a growing registry of deep MCP servers for critical third-party applications (e.g., Stripe, Gmail, Notion). These go beyond the shallow integrations offered by public MCP directories, giving enterprises ready access to fully covered, deeply functional MCP connectors that empower agents to execute end-to-end workflows across apps without restrictions.
Agent Builder & Workflow Automation
By auto-generating natural language-driven Actions, Adopt simplifies the orchestration of complex multi-agent workflows. This reduces development complexity and ensures agents can coordinate tasks seamlessly across internal and external systems.
Built-In Security & Context Management
The platform embeds strong encryption, fine-grained access controls, and real-time synchronized context management. This ensures sensitive data remains secure while maintaining operational consistency across distributed agents
Production-Grade Infrastructure
Adopt delivers built-in CI/CD pipelines, monitoring, and analytics to support scalable, reliable deployments. This accelerates time-to-market while removing common operational bottlenecks.
The Adopt Differentiator
Where most integrations stop at surface-level actions, Adopt delivers full-stack MCP coverage turning every endpoint into an agent-ready capability and providing a registry of deep connectors for external apps. This combination makes agents truly powerful, capable of executing end-to-end workflows across systems without friction.
Conclusion
Getting a good handle on MCP and A2A protocols is crucial for building AI systems that aren’t just smart but work well together and can grow with your needs. MCP acts like a universal adapter for AI agents, letting them securely connect to the tools, data, and services they need without messy custom integrations. Meanwhile, A2A is like a common language that helps different AI agents communicate, collaborate, and divide up complex tasks efficiently.
Throughout this article, you’ve seen how these two protocols complement each other to create flexible, scalable AI ecosystems. MCP provides the foundation for safe and standardized tool access, while A2A brings the social dimension enabling agents to talk and work together as a team. Mastering both will help you design resilient AI applications that solve real-world challenges by working smarter, not harder.
If you’re a developer building the future of AI collaboration, exploring MCP and A2A is a great place to start. Check out its official docs, try open-source tools, and join communities shaping these evolving standards. You'll find exciting opportunities to innovate and build AI systems that truly talk and collaborate.
To simplify adoption and speed up development, consider platforms like Adopt AI, which provide ready-made tools and frameworks that help you seamlessly integrate MCP and A2A protocols into your applications, reducing complexity and accelerating time-to-value.
FAQs
- What distinguishes MCP from A2A? - MCP handles how applications provide context to models/tools, focusing on enriching inputs, whereas A2A focuses on communication and collaboration between autonomous AI agents.
- Can A2A replace MCP? - No. MCP lets AI agents securely connect to tools and data, giving them what they need to work on tasks accurately. A2A helps multiple agents talk to each other and work together smoothly on complex jobs. They do different things but work best when combined, making AI systems more powerful and flexible
- How to use A2A and MCP together? - To use A2A and MCP together, start by setting up an MCP server that provides agents with secure access to external tools and data. Then create AI agents using the Agent Development Kit (ADK) that utilize MCP for context and data fetching. Finally, expose these agents as A2A servers to enable stateful, direct communication and collaboration among agents, orchestrating complex multi-agent workflows seamlessly.
- What infrastructure is needed to deploy MCP and A2A in production? - Cloud platforms, container orchestration (e.g., Kubernetes), CI/CD pipelines, API gateways, and monitoring tools are commonly used to support scalable and reliable agent deployments.

.svg)
.svg)


Take three minutes to find out which side of that line you are on.
Browse Similar Articles


Find Your Agentic AI Readiness Score
Every enterprise thinks they are building toward Agentic AI. But only few actually are.
Take three minutes to find out which side of that line you are on.