Compare top open-source AI agent frameworks and learn how Adopt AI eliminates tooling bottlenecks with zero-shot agents and workflows.


.png)
TL;DR
- Open source AI agent frameworks provide the foundation for building intelligent AI agents that orchestrate LLMs (e.g., GPT-4, LLaMA, Claude) with external tools (e.g., calculators, code execution, web search) and APIs (e.g., Google Search API, Outlook API, Hugging Face Inference API). They make it relatively simple to spin up your first prototype agent, but as soon as you try to build your second, third, or tenth agent, the lack of built-in orchestration, tooling, and reliability surfaces quickly.
- Popular open source frameworks such as LangChain,
LangGraph, AutoGPT, CrewAI, Semantic Kernel, and SmolAgents provide modular primitives for chaining calls, managing state, and building multi-agent workflows. Their lightweight design makes them ideal for rapid experimentation and research, but stitching them into a coherent, repeatable system of agents across your product still demands heavy custom work. - Adopt AI isn’t another framework in this mix. It’s the tooling layer underneath them. We auto-generate zero-shot tools and agents from your application’s APIs and business logic, so you don’t spend months wiring endpoints manually. Those tools can plug directly into frameworks like LangChain or LangGraph—but instead of starting from scratch, you begin with a production-ready foundation. The value is simple: faster time-to-market and far less engineering effort, because Adopt handles the heavy lifting of tooling.
AI agents are dynamic software entities that can observe, reason, and act in pursuit of specific goals. Unlike traditional systems such as rule-based chatbots, fixed APIs, or standalone utilities, these agents combine large language models (LLMs) with tools, and structured prompts to create adaptive, task-oriented workflows through AI agent orchestration. At the heart of this shift are open source AI agent frameworks—think of them as modular toolkits that let developers assemble reasoning agents, run workflows, and manage state without reinventing core components. In this article, we examine the most influential open source frameworks enabling teams to architect robust, agentic systems with real-world usability.
What Are AI Agent Frameworks?
AI agent frameworks are software platforms designed to streamline the creation, deployment, and lifecycle management of agents built on large language models (LLMs). Instead of hand-coding orchestration logic or wiring together APIs manually, these frameworks provide pre-built primitives—such as memory stores, tool and API connectors, workflow managers, and observability. With these components, agents can not only process and reason over context but also execute actions across external systems. In practice, this means teams can move beyond prototypes and design scalable, production-ready agent pipelines without having to reimplement core infrastructure each time.
Key Components of an AI Agent
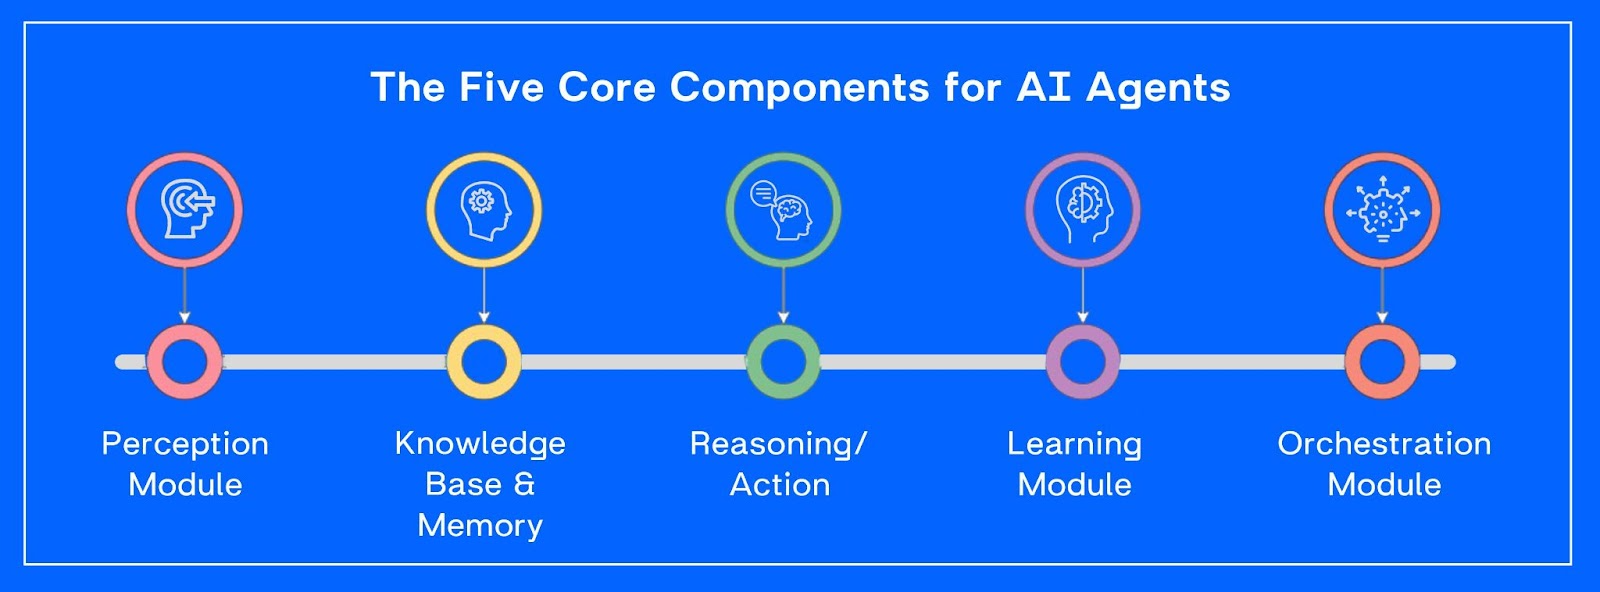
Most agents rely on the following key components:
- Perception Layer: Allows agents to gather inputs from users, APIs, sensors, or documents, forming the raw data they need to process.
- Reasoning & Planning: Acts as the agent’s brain, using LLMs, planners, or knowledge graphs to decide what actions to take.
- Memory: Provides continuity through short-term memory (context windows for active tasks) and long-term memory (vector databases or knowledge bases).
- Action & Tooling: Connects agents to external APIs, databases, or scripts, enabling them to perform actions beyond just conversation.
- Learning & Adaptation: Improves performance over time by incorporating feedback loops, fine-tuning, or reinforcement learning signals.
- Orchestration Layer: Serves as the runtime that coordinates workflows, manages multiple agents, and ensures monitoring and observability.
Top 7 Open Source AI Agent Frameworks
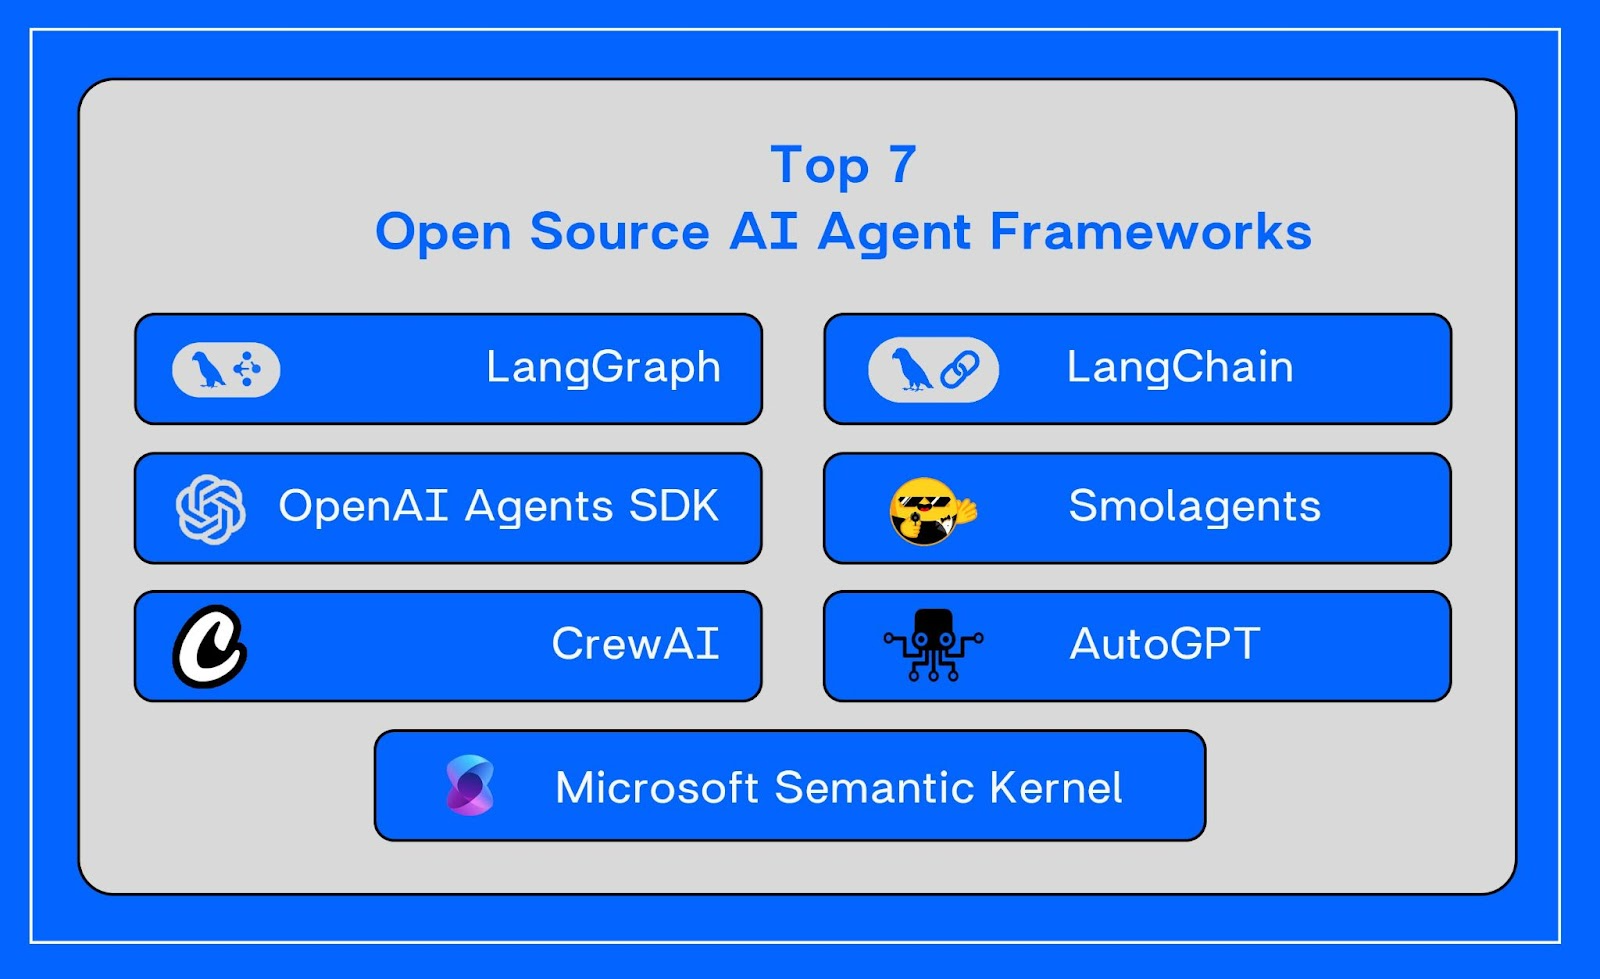
Here are the top 7 open source AI agent frameworks that provide the building blocks for AI agent orchestration, enabling agents to coordinate tasks across tools and APIs.
LangGraph
Overview
LangGraph is an open-source orchestration framework developed by LangChain for constructing stateful, multi-agent systems using a graph-based workflow model where each node represents an agent or tool, and edges define control flows.
The framework allows developers to construct complex, reliable workflows using graph architecture, offering flexibility across single-agent, multi-agent, hierarchical, and sequential patterns.
Key Features of LangGraph
- Graph orchestration: Nodes and edges enable clear, visualizable workflows.
- Human-in-the-loop: Insert checkpoints for human intervention and moderation throughout workflow execution.
- Persistent memory: Context is maintained across long-running workflows, enabling robust state handling.
- LangChain ecosystem integration: Seamlessly pairs with tools like LangSmith for observability and the LangGraph Platform for production deployment.
Hands-on Example
Let's Build a Simple AI Workflow with LangGraph.
Step 1 - Install dependencies and import libraries:
!pip install langgraph langchain-openai python-dotenv

from langgraph.graph import StateGraph, START, END
from langchain_openai import ChatOpenAI
import os
from typing import Dict, Any, TypedDict
Import the essential components: StateGraph for workflow creation, START/END markers, and typing for state structure.
Step 2 - Define State and Node Functions
(You’ll need an OpenAI-compatible chat model + API key in your env, e.g. OPENAI_API_KEY.)
import os
from google.colab import userdata

os.environ["OPENAI_API_KEY"] = userdata.get("OPENAI_API_KEY")
llm = ChatOpenAI(model="gpt-4o-mini", temperature=0.7)
print("LLM initialized successfully!")
# Define the state structure
class GraphState(TypedDict):
user_name: str
query: str
messages: list
def greet_user(state: GraphState) -> GraphState:
"""First node: Greets the user"""
user_name = state.get("user_name", "Friend")
greeting = f"Hello {user_name}! How can I help you today?"
return {**state, "messages": [greeting]}
def process_query(state: GraphState) -> GraphState:
"""Second node: Processes user query with LLM"""
query = state.get("query", "")
response = llm.invoke(f"Please provide a helpful response to: {query}")
messages = state.get("messages", [])
messages.append(f"AI: {response.content}")
return {**state, "messages": messages}Define our data structure (GraphState) and create two workflow nodes: one for greeting users and another for processing queries.
Step 3 - Create the Graph
# Initialize the StateGraph
workflow = StateGraph(GraphState)

# Add nodes
workflow.add_node("greet", greet_user)
workflow.add_node("process", process_query)

# Define the flow
workflow.add_edge(START, "greet")
workflow.add_edge("greet", "process")
workflow.add_edge("process", END)

# Compile the graph
app = workflow.compile()
Build our workflow by connecting nodes in sequence: START: greet: process: END, then compile it into an executable application.
Step 4 - Test the Workflow
# Test input
initial_state = {
    "user_name": "Alice",
    "query": "What are the benefits of using LangGraph?"
}

# Run the workflow
result = app.invoke(initial_state)
print("Workflow completed!")
print("\nMessages:")
for message in result["messages"]:
    print(f"- {message}")
Execute our workflow with sample data and see the complete conversation flow from greeting to AI response.
This simple example of conversation withAI agent demonstrates the core concepts: state management, node functions, and linear execution flow.
Pros
- Enables orchestration of complex, stateful, multi-agent workflows with high transparency.
- Graph structure simplifies debugging and workflow design.
- Robust support for memory and human intervention, making agents more reliable and controllable.
Cons
- Has higher setup complexity than lightweight frameworks like Smolagents.
- Requires familiarity with graph modeling concepts.
- Still relatively new, so the ecosystem and documentation are developing.
Pricing
LangGraph is open-source and free to use, licensed under MIT/Apache, and available for self-hosted or enterprise extension through LangGraph Platform when scaled to production.
LangChain
Overview
LangChain is one of the most widely adopted frameworks for building LLM-powered applications. It provides a modular architecture with components like chains, memory, agents, and tools that developers can mix and match to create chatbots, knowledge assistants, and autonomous agents. Its flexibility makes it suitable for both prototypes and production-grade systems.
Key Features of LangChain
- Chains: Sequence together LLM calls, prompts, and logic into workflows.
- Memory: Store conversational history or domain-specific context for continuity.
- Agents: Enable LLMs to dynamically select and use tools (search, databases, APIs).
- Integrations: Works seamlessly with OpenAI, Anthropic, Hugging Face, Pinecone, Weaviate, and many others.
- LangServe: Deploy LangChain apps as API endpoints for scalable use in products.
Hands-on Example
We will create a basic conversational AI agent using LangChain framework that can maintain conversation context and provide intelligent responses.
Step 1 - Install LangChain and import libraries
!pip install langchain
from langchain.llms.base import LLM
from langchain.memory import ConversationBufferMemory
from langchain.chains import ConversationChain
from typing import Optional, List
Step 2 - Invoke your open ai key and initialize the language model
from google.colab import userdata
os.environ["OPENAI_API_KEY"] = userdata.get('OPENAI_API_KEY')

# Initialize the OpenAI language model
Llm = OpenAI( temperature = 0.7, max_tokens = 200
		 model _name = "gpt-3.5-turbo-instruct"
)
Step 3 - Setup Memory and Chain
# Create memory and conversation chain
memory = ConversationBufferMemory()
conversation = ConversationChain(
    llm=mock_llm,
    memory=memory,
    verbose=True
)
Sets up memory to remember conversation history and creates a chain that connects the mock LLM with memory.
Step 4 - Create Simple AI Agent
class SimpleAgent:
    def __init__(self, chain):
        self.chain = chain

    def chat(self, message):
        return self.chain.predict(input=message)

# Create conversational AI agent
agent = SimpleAgent(conversation)
Creates a simple wrapper agent class that provides an easy interface to interact with the conversation chain.
Step 5 - Demo Conversation with our AI Agent
# Demo conversation
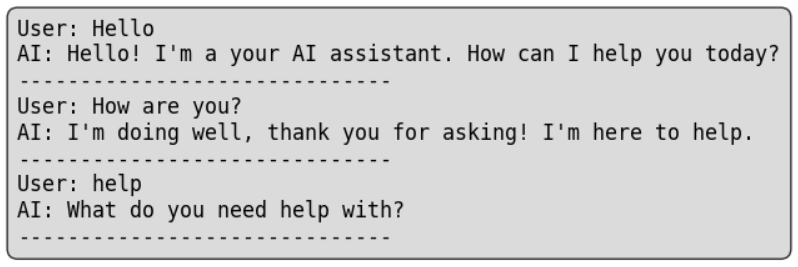
messages = ["Hello", "How are you?", "help"]

print("Demo Conversation:")
print("=" * 40)

for msg in messages:
    response = agent.chat(msg)
    print(f"User: {msg}")
    print(f"AI: {response}")
    print("-" * 20)
Demonstrates the agent in action by running through a sample conversation and showing how it maintains context.
Result:
Pros
- Mature and stable ecosystem with thousands of production deployments.
- Extensive community support and documentation.
- Flexible for both quick experiments and enterprise-grade systems.
Cons
- Can feel heavy for small projects where simple API calls suffice.
- Some performance overhead due to abstraction layers.
- The learning curve is steeper compared to lightweight libraries.
Pricing
LangChain is free and open-source (MIT License).
Costs depend only on the LLM, APIs, or vector databases you integrate.
OpenAI Agents SDK
Overview
The OpenAI Agents SDK is the official toolkit from OpenAI for building agents with tools, memory, and orchestration. While designed to be provider-agnostic, it integrates deeply with OpenAI models and services, offering a streamlined way to build production-ready AI workflows.
Key Features of OpenAI Agents SDK
- Tool Calling: Agents can call APIs, functions, or custom tools directly.
- Tracing & Monitoring: Built-in observability features for debugging and optimization.
- Multi-Agent Orchestration: Manage complex workflows across multiple cooperating agents.
- Compatibility: Native support for OpenAI models with the option to connect external APIs.
- Extensibility: Developers can customize memory, reasoning, and orchestration logic.
Hands-on Example
We’ll build a simple agent that uses a calculator tool to solve math problems.
Step 1 - Install packages and import libraries
!pip install openai

from openai import OpenAI
import json
import os

# Initialize OpenAI client
client = OpenAI(
    api_key="your_open_ai_key"
)
# Initialize the OpenAI language model
Llm = OpenAI( temperature = 0.7, max_tokens = 200
		 model_name = "gpt-3.5-turbo-instruct"
)
Step 2 - Define Calculator Tool Function
def calculator(expression: str) -> str:
    """
    Simple calculator that evaluates basic math expressions
    """
    try:
        # Safe evaluation of basic math expressions
        allowed_chars = "0123456789+-*/.() "
        if all(c in allowed_chars for c in expression):
            result = eval(expression)
            return f"Result: {result}"
        else:
            return "Error: Invalid characters in expression"
    except Exception as e:
        return f"Error: {str(e)}"

# Test the calculator
print(calculator("2 + 3 * 4"))
print(calculator("(10 + 5) / 3"))
Creates a safe calculator function that evaluates basic math expressions and tests it with sample calculations.
Step 3 - Define Tool Schema for OpenAI
tools = [
    {
        "type": "function",
        "function": {
            "name": "calculator",
            "description": "Performs basic mathematical calculations",
            "parameters": {
                "type": "object",
                "properties": {
                    "expression": {
                        "type": "string",
                        "description": "Mathematical expression to evaluate (e.g., '2+3*4', '(10+5)/3')"
                    }
                },
                "required": ["expression"]
            }
        }
    }
]
Defines the calculator tool schema in OpenAI format so the agent knows how to call the calculator function.
Step 4 - Create the Agent Function
def math_agent(user_question: str):
    """
    Simple math agent that can solve problems using calculator tool
    """
    messages = [
        {
            "role": "system",
            "content": "You are a helpful math assistant. Use the calculator tool to solve mathematical problems. Always show your work."
        },
        {
            "role": "user",
            "content": user_question
        }
    ]

    # First API call to get the assistant's response
    response = client.chat.completions.create(
        model="gpt-3.5-turbo",
        messages=messages,
        tools=tools,
        tool_choice="auto"
    )

    return response
Creates the main agent function that sends user questions to the AI model with access to calculator tools.
Step 5 - Handle Tool Calls
def handle_tool_calls(response, messages):
    """ Process tool calls from the assistant """
    assistant_message = response.choices[0].message
    messages.append({ "role": "assistant", "content": assistant_message.content,
                      "tool_calls": assistant_message.tool_calls
    })
    if assistant_message.tool_calls:
        print("Assistant is calling the calculator tool...")
        for tool_call in assistant_message.tool_calls:
            if tool_call.function.name == "calculator":
                args = json.loads(tool_call.function.arguments)
                expression = args["expression"]
                result = calculator(expression)
                print(f"📊 Calculating: {expression}")
                print(f"📋 {result}")
                # Add tool result to messages
                messages.append({"role": "tool", "tool_call_id": tool_call.id,
                                  "content": result
                })
        # Get final response with tool results
        final_response = client.chat.completions.create( model="gpt-3.5-turbo",
                                                        messages=messages
        )
        return final_response.choices[0].message.content
    else:
        return assistant_message.content
Handles the agent's tool calls by executing the calculator function and returning results back to the agent.
Step 6 -Test the Complete Agent
def solve_math_problem(question: str):
    """ Complete function to solve math problems """
    print(f"Question: {question}")
    print("-" * 50)
    # Initialize conversation
    messages = [{
            "role": "system",
            "content": "You are a helpful math assistant. Use the calculator tool to solve mathematical problems."
            },{
            "role": "user",
            "content": question
            }
    ]
    # Get initial response
    response = client.chat.completions.create( model="gpt-3.5-turbo", messages=messages, tools=tools, tool_choice="auto"
    )
    # Handle any tool calls
    final_answer = handle_tool_calls(response, messages)
    print(f"Answer: {final_answer}")
    return final_answer
# Test with sample problems
solve_math_problem("What is 25 * 4 + 10?")
Combines all components to create a complete math-solving agent and tests it with a sample problem.
Result:

The agent chooses the calculator tool to solve the problem, showing how tool-calling and orchestration work seamlessly.
Pros
- Official OpenAI SDK: Always aligned with latest model capabilities.
- First-class observability: Tracing and debugging built in.
- Tight ecosystem integration: Works directly with ChatGPT, Assistants API, etc.
Cons
- Heavily tied to OpenAI: Despite provider-agnostic claims, it favors OpenAI-first setups.
- Less community-driven: Fewer plugins/extensions compared to LangChain.
- Still maturing: Ecosystem isn’t as large as established frameworks.
Pricing
- Free & open-source SDK.
- Pay only for OpenAI API usage (standard pay-as-you-go pricing).
Smolagents
Overview
Smolagents is a lightweight, Python-first framework for quickly building AI agents. Its design philosophy is simplicity with minimal dependencies, fast setup, and seamless integration into existing Python workflows. Perfect for researchers, hobbyists, or developers who want to experiment without the overhead of larger frameworks.
Key Features of Smolagents
- Python-native: Agents run directly inside your Python scripts.
- Minimal overhead: Small footprint, quick installation.
- Customizable agents: Basic reasoning and tool usage support.
- Rapid prototyping: Excellent for experimentation, teaching, and academic use.
Hands-on Example
We will build a mini research assistant that searches the web and summarizes results.
Step 1 - Install smolagents and other dependencies
!pip install smolagents

# Install Hugging Face Hub (for inference client)
!pip install huggingface_hub

# for web search, we'll use DuckDuckGo
!pip install duckduckgo-search

from huggingface_hub import login

# Replace with your actual token string
login("your_hf_token_here")Add and login with your hf_token: Link
Step 2 - Create an agent powered by a Hugging Face model and connect it to a web search tool
from smolagents import CodeAgent, WebSearchTool, InferenceClientModel
import textwrap
# Step 1: Define a web search tool for retrieving information.
search_tool = WebSearchTool()

# Step 2: Use an open Hugging Face model via inference API.
model = InferenceClientModel(model_id="Qwen/Qwen2.5-Coder-32B-Instruct")

# Step 3: Create the agent with the search tool.
agent = CodeAgent(
    tools=[search_tool],
    model=model,
    stream_outputs=True  # Optional: stream partial results for feedback
)

# Step 4: Ask the agent to do a quick research and summary task.
prompt = (
    "Research: What are the top three benefits of renewable energy sources? "
    "Summarize in two sentences."
)

result = agent.run(prompt)

wrapped_result = "\n".join(textwrap.wrap(result, width=120))  # ~17 words ≈ 120 chars
print(wrapped_result)
With just a few lines, Smolagents transforms into a research assistant capable of combining search and reasoning.
Result:

Pros
- Super lightweight: No unnecessary complexity.
- Beginner-friendly: Ideal for students and quick projects.
- No lock-in: 100% open-source and flexible.
Cons
- Not enterprise-grade: Limited orchestration and scaling support.
- Small ecosystem: Fewer tools compared to LangChain or OpenAI SDK.
- No built-in monitoring: Lacks observability features.
Pricing
- Free & open-source.
- Only external API or LLM usage costs apply.
CrewAI
Overview
CrewAI is a framework for role-based multi-agent collaboration, designed to mimic real-world teamwork. Its design makes it suitable for complex AI agent orchestration where multiple tools and roles must work together. Instead of one agent doing everything, CrewAI assigns agents specific roles (like researcher, writer, or reviewer), who then collaborate using shared context and memory to produce refined outputs step by step. This approach is especially useful for complex workflows that require multiple perspectives and coordinated effort.
Key Features of CrewAI
- Role-based design: agents work as researcher, writer, reviewer, etc.
- Shared context & memory: agents build on each other’s work seamlessly.
- Stepwise orchestration: structured workflows where outputs refine at each stage.
- Collaboration focus: designed for tasks needing teamwork and delegation.
Hands-on Example
Step 1 - Install CrewAI and other dependencies and initialize the language model.
!pip install crewai langchain-openai python-dotenv

import os
from crewai import Agent, Task, Crew, Process
from langchain_openai import ChatOpenAI
from getpass import getpass

# Set up OpenAI API key
os.environ['OPENAI_API_KEY'] = getpass("Enter your OpenAI API key: ")

# Initialize the language model
llm = ChatOpenAI(model="gpt-3.5-turbo", temperature=0.7)
Step 2 - Define Agents (research, writer and editor)
# Research Agent - specializes in gathering information
researcher = Agent(
    role='Research Specialist',
    goal='Gather comprehensive information about the given topic',
    backstory="""You are an experienced researcher with a keen eye for finding
    relevant and accurate information. You excel at identifying key points,
    statistics, and trends related to any topic.""",
    verbose=True,
    allow_delegation=False,
    llm=llm
)

# Writing Agent - specializes in creating engaging content
writer = Agent(
    role='Content Writer',
    goal='Create engaging and well-structured blog posts',
    backstory="""You are a skilled content writer who can transform research
    into compelling, readable blog posts. You have a talent for making complex
    topics accessible to general audiences.""",
    verbose=True,
    allow_delegation=False,
    llm=llm
)

# Editor Agent - reviews and improves content
editor = Agent(
    role='Content Editor',
    goal='Review and enhance written content for clarity and engagement',
    backstory="""You are a meticulous editor with years of experience in
    publishing. You ensure content is error-free, well-structured, and
    engaging for the target audience.""",
    verbose=True,
    allow_delegation=False,
    llm=llm
)
Step 3 - Define Tasks
# Define the topic for demonstration
 = "The Future of Renewable Energy"

# Task 1: Research the topic
research_task = Task(
    description=f"""Research the topic '{topic}'.
    Gather key information including:
    - Current market trends
    - Major technologies
    - Recent developments
    - Future predictions

    Provide a comprehensive research summary.""",
    agent=researcher,
    expected_output="A detailed research summary with key facts and trends"
)

# Task 2: Write the blog post
writing_task = Task(
    description=f"""Using the research provided, write an engaging blog post about '{topic}'.
    The blog post should be:
    - 400-600 words long
    - Have a compelling introduction
    - Include 3-4 main sections
    - End with a strong conclusion

    Make it informative yet accessible to general readers.""",
    agent=writer,
    expected_output="A complete blog post ready for publication"
)

# Task 3: Edit and improve
editing_task = Task(
    description="""Review the blog post and make improvements for:
    - Grammar and spelling
    - Flow and readability
    - Engagement and clarity
    - Overall structure

    Provide the final polished version.""",
    agent=editor,
    expected_output="A polished, publication-ready blog post"
)
Step 4 - Build the Crew (Multi-Agent Team)
#Run the Crew workflow
from crewai import Crew

crew = Crew(
    agents=[researcher, writer, reviewer],
    tasks=[task1, task2, task3]
)

final_result = crew.kickoff()
print(" Final Result:\n")
print(final_result)
Combine agents and tasks into a crew that collaborates step by step.
Result:

Pros
- Unique role-based approach for teamwork simulation.
- Effective for complex workflows with multiple perspectives.
- Open-source with a steadily growing community.
Cons
- Still new, with a smaller ecosystem.
- Careful setup needed for large workflows.
- Lacks advanced monitoring/observability vs. LangChain or OpenAI SDK.
Pricing
- Free & open-source.
- Costs apply only for underlying model APIs (OpenAI, Anthropic, etc.).
AutoGPT
Overview
AutoGPT is one of the earliest and most influential autonomous AI agent frameworks. It introduced the idea of giving an AI a single high-level objective, after which the system autonomously breaks it down into subtasks, executes them step by step, and integrates tools (like web browsing or APIs) with minimal human intervention. It was widely popular in 2023 for showcasing the potential of self-directed AI systems.
Key Features of AutoGPT
- Goal-driven autonomy: Provide a high-level task, and AutoGPT handles the planning & execution.
- Task decomposition: Breaks down big objectives into smaller, manageable steps.
- Tool & internet integration: Can browse, use APIs, and interact with local files.
- Memory system: Maintains short-term recall for continuity across steps.
Hands-on Example
- Install autogpt or use web builder
- Add Input, AI Text Generator and Output Block

- Connect Result of Agent Input block with AI Text Generator block and then response of AI text generator to agent output block.
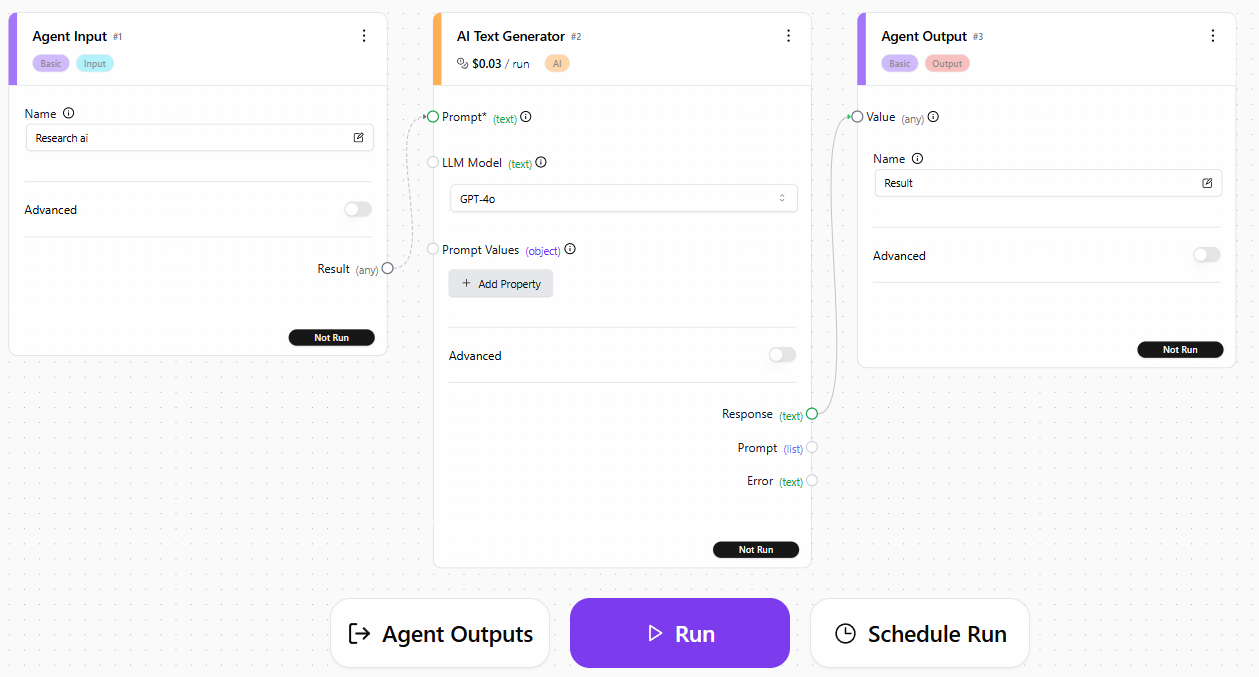
- Hit Run button and enter any prompt
For example: Research top 10 AI tools and create a report.

- Let AutoGPT work its magic.
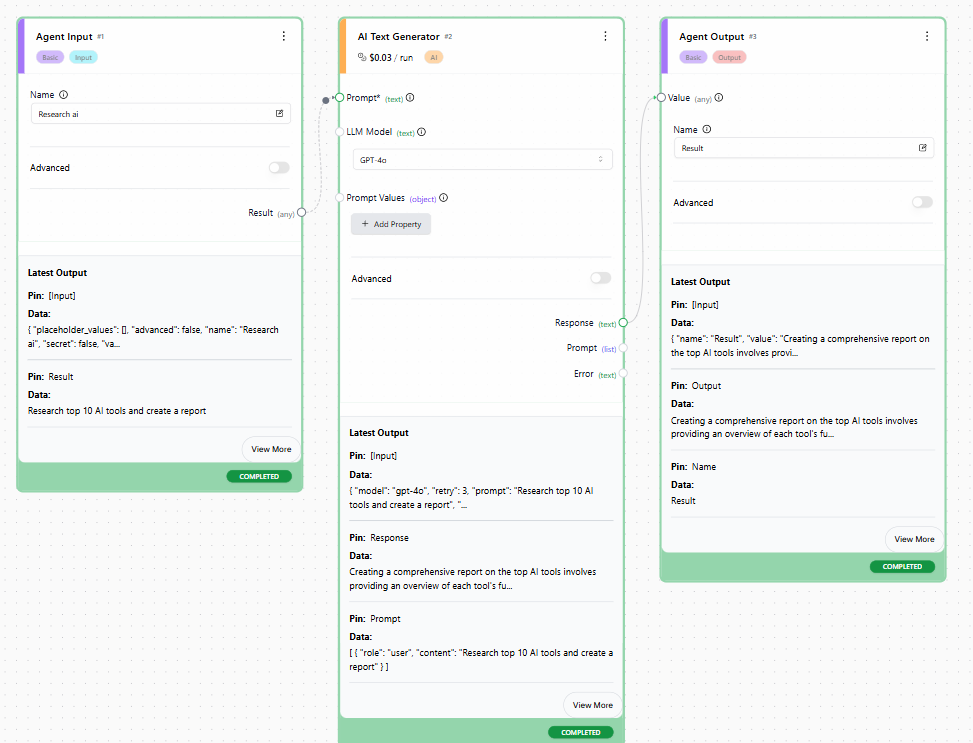
Result:

Pros
- Pioneering framework that set the foundation for modern agent systems.
- Large open-source community, with many plugins and integrations.
- Good for experimentation, demos, and proof-of-concepts.
Cons
- Unreliable execution, sometimes stuck in loops or hallucinations.
- Resource-heavy and slow, especially with bigger models.
- Requires supervision, not yet fit for unsupervised production tasks.
Pricing
AutoGPT is free & open-source. The only cost comes from the underlying LLM API (e.g., OpenAI GPT-4 or other backends).
Microsoft Semantic Kernel
Overview
Microsoft Semantic Kernel (SK) is an open-source SDK designed to embed AI directly into apps and workflows. It combines LLMs with traditional programming constructs like plugins, connectors, and memory allowing developers to build smart, context-aware applications.
Key Features of Microsoft Semantic Kernel
- Plugins & Skills: Extend functionality by connecting to APIs, tools, and custom logic.
- Planners: Automatically break down high-level goals into actionable steps.
- Memory: Store and recall contextual information across interactions.
- Connectors: Integrate smoothly with external systems (e.g., Outlook, SharePoint, Teams).
Hands-on Example
Step 1 - Install and configure Semantic Kernel SDK
# Step 1: Install Semantic Kernel SDK
!pip install semantic-kernel

# Step 2: Setup the Kernel and OpenAI service (for planning)
from semantic_kernel import Kernel
from semantic_kernel.connectors.ai import AzureChatCompletion, FunctionChoiceBehavior

# Replace placeholders with your Azure configuration
kernel = Kernel()
kernel.add_service(AzureChatCompletion(
    endpoint="YOUR_AZURE_ENDPOINT",
    api_key="YOUR_AZURE_KEY",
    model="gpt-4"
))

settings = kernel.create_prompt_settings(function_choice_behavior=FunctionChoiceBehavior.Auto)
Installs and configures the kernel with planning capabilities using a GPT model supporting function calling.
Step 2 - Add Microsoft Graph Calendar plugin for scheduling and use the planner to generate tasks from a goal
from semantic_kernel.core_plugin import calendar

kernel.import_plugin_from_type(calendar.CalendarPlugin, "Calendar")

goal = "Schedule a 30-minute team sync next Tuesday afternoon."
plan = kernel.create_plan(goal, settings=settings)

print("Generated Plan:")
print(plan)
Adds a plugin for accessing Outlook calendar via Microsoft Graph and generates a step-by-step plan to schedule a meeting based on the goal.
Output:

Step 3 - Execute the plan to book the meeting
result = kernel.run_plan(plan)
print(result)
Executes the plan, invoking tools like the Calendar plugin to schedule the meeting.
Output:

Step 4 - Summarize plan and booked meeting
from semantic_kernel.connectors.ai.chat_completion_client_base import ChatCompletionClientBase

summary = kernel.chat("Summarize the steps and meeting details in one sentence.")
print("AI Summary:")
print(summary)
Uses LLM capabilities to summarize planning results and booked meeting details.
Output:

Pros
- Strong backing & integration in the Microsoft ecosystem.
- Highly extensible via plugins, connectors, and skills.
- Multi-language SDK support (C#, Python, Java) for diverse dev teams.
Cons
- Steeper learning curve compared to lighter frameworks like CrewAI.
- May feel overkill for simple AI prototypes or one-off experiments.
Pricing
- Free & open-source SDK.
- Costs depend on the LLM provider (Azure OpenAI, Hugging Face, etc.).
- Example: GPT-4 on Azure = ~$0.03–$0.06 per 1K tokens.
Which AI Agent Framework Fits You Best? 2025 Comparison
The Limitations of Open Source AI Agent Frameworks
While open-source frameworks have accelerated experimentation, they present several challenges when used for building agents at scale:
- Fragmentation: The ecosystem is crowded with frameworks offering similar features, making it difficult for teams to choose, standardize, or consolidate around a single approach.
- Scalability Issues: Many options are research-oriented prototypes rather than enterprise-ready solutions, limiting their ability to handle production-level reliability, performance, and security.
- Complex Integration: Developers often need to manually connect components such as memory, orchestration, observability, and external APIs, which increases complexity and slows down delivery.
- Limited Monitoring & Testing: Debugging agent behavior, validating outputs, and ensuring consistent reliability remain unresolved pain points across most open-source solutions.
- Hidden Costs: Although the software itself is free, the engineering time and operational overhead required to maintain and scale these frameworks often outweigh the initial savings.
These challenges highlight the need for a unified infrastructure layer that simplifies tooling, scales with production demands, and embeds monitoring from the start - an approach that platforms like Adopt AI are specifically designed to deliver.
How Adopt AI Helps You Accelerate Your Agent Roadmap
Open-source frameworks like LangChain, LangGraph, and CrewAI are powerful for orchestrating agents. They offer the primitives for reasoning, state management, and multi-agent collaboration.
But when it comes to building agents that take action inside your product — you're on your own.
To make any agent actually execute workflows, you first need to manually wire your app’s APIs into callable tools:
- Define each endpoint’s parameters, payloads, and authentication
- Add semantic context so the LLM understands how to use it
- Chain tools into structured workflows with retries, filters, and branching
- Test and debug each step to ensure correct behavior
This is the plumbing work that slows teams down. Frameworks help with orchestration — but not with the foundational tooling layer every agent needs.
That’s where Adopt AI comes in.
Think of Adopt as the foundation layer for your agent roadmap. We don’t replace frameworks — we supply the building materials and infrastructure they need to work.
- We auto-discover your app’s APIs, entities, and workflows, and turn them into ready-to-use tools — instantly, using a proprietary technology called ZAPI (Zero-Shot API Ingestion).
- We auto-generate skills by chaining tools into workflows with intent mapping, fallback logic, and response shaping built-in.
- You can consume these tools and skills inside any agent framework — including LangChain and LangGraph — via simple bindings.
Here's a quick video walkthrough of how Adopt auto-discovers your API's and creates agent ready tools -
Key Outcomes Teams Achieve with Adopt AI
Teams using Adopt see measurable gains across both speed and scale:
- Full API & Action Coverage
No more hand-coding tool definitions. Adopt auto-generates tooling coverage across your entire app — with minimal engineering lift. - Faster Time to Market
With zero-shot tools and prewired skills, teams skip setup and ship production agents in days, not months. - Enterprise-Ready Deployment
Adopt supports on-prem Helm-based deployment — meeting strict VPC, security, and compliance requirements that most frameworks can’t. - Granular Tool Governance
Enable or restrict tools per agent with fine-grained control — helpful for UX, trust, and internal approvals. - No Reinventing the Wheel
Adopt includes prebuilt modules for memory, logging, streaming, structured inputs/outputs, and more — reducing redundancy and engineering effort.
Want to see how Adopt can accelerate your agent roadmap? Get in touch, our team is always happy to chat.
Conclusion
Frameworks give you orchestration flexibility.
Adopt gives you the tooling foundation and enterprise-grade infrastructure to go from raw API to production-ready agent — fast.
Use Adopt to skip the wiring, build with confidence, and accelerate your roadmap to intelligent, in-product automation.
FAQ’s
1. Can I use Adopt AI alongside LangChain or LangGraph?
Yes. Adopt isn’t a replacement for orchestration frameworks — it’s the tooling layer underneath them. We auto-generate agent-ready tools and workflows that can be consumed directly inside LangChain, LangGraph, or any other agent framework.
2. What exactly do you mean by “Zero-Shot Tooling”?
We automatically discover and convert your app’s APIs, entities, and workflows into callable tools — with no manual setup. Each tool is enriched with schema, context, and prompt examples, making it usable out of the box without any custom wiring.
3. What kinds of workflows can Adopt generate?
Beyond single-step API calls, Adopt can generate multi-step skills — like “Notify admin if license is unused” — by chaining tools, filtering data, applying conditions, and formatting the output. These skills are production-grade and can be used across agents.
4. Do I have to use Adopt’s agent builder to use the tools?
Not at all. You can use Adopt-generated tools and skills inside your existing agent frameworks or infrastructure. But if you want to go end-to-end, Adopt also provides a full agent lifecycle platform — with testing, logging, UX components, and deployment support.
5. How quickly can I get started with Adopt AI?
Within 24 hours of providing access to your app (demo credentials or API specs), Adopt will auto-generate a full suite of tools and workflows you can start using immediately — either inside Adopt or exported to your preferred stack.
Browse Similar Articles
Accelerate Your Agent Roadmap
Adopt gives you the complete infrastructure layer to build, test, deploy and monitor your app’s agents — all in one platform.


.png)
.png)
.png)


.svg)
.svg)

